The controls of the Short View Account Names Form.
Horizontally scrollable display of primary information.
Toggle buttons to turn on or off display of secondary information (i.e. Security Image(s), Secret Questions and Answers, Notes and
Related links)
Hidden password display until double clicked
Copy to clipboard notification
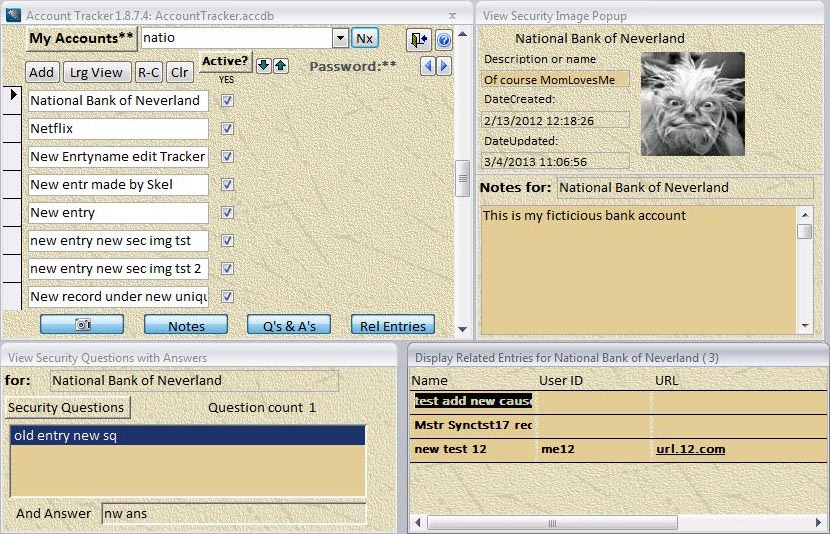
This is alternate method of viewing your accounts. Actually it is the default setting when you install Account Tracker.
The
Expanded detailed view form displayed all the information of an entry at once. It is a large form and may not display well on
a smaller screen. So here is a smaller view; it displays all the same information, but at the users control of when. The Accounts Name
form has all the capabilities of the Expanded form except for Sorting and filtering. The Account Names Form (the Short View) gains
access to the Maintenance form in the same manner as that the Expanded Detailed View Forms does;
a double click on the Accounts label. Once again the image below is interactive and you can click on most parts of it for a more in-depth
description.
The Add New button initiates the process of adding a new entry or record. It will display the Add New Entries form.
This label has a double asterisks behind it, meaning it does something when you double click on it. All labels in Account Tracker, that serve as actuators or buttons, will have asterisks behind them(*).
In this case, the Account List label, there is a double asterisks. So it's a double click actuator. When it is double clicked the Maintenance window is displayed.
The Clear Button
This button removes the ascending or descending display field sort of the entries and returns the list to original entry order.
In this area Horizontal Scroll data is displayed. Each field
displayed in this area can be double clicked to bring up the Edit Entry screen.
The Entry Name field. Here is displayed the name you have given this entry. You can double click on this field to bring up the
Edit Entry screen.
The Sort Buttons
These buttons will sort the records based on the field displayed; the up arrow button sorts the list in ascending order while the down arrow
button sorts the list in descending order.
The Search Bar
Here is where you type in a bit of info that will be used to find the record you want. If I'm looking for the entry for my bank account at the First Bank of Never Never Land
I would possibly type 'never' or 'nev'. When I click on the 'Go' button or press Enter the Account list focus would be brought to the very first record that had
'never' or 'nev' in it. Whether it be a part of a word or a full word. All searches begin at the beginning of the list. After the initial search the 'go' button becomes a 'Nx' button (Next).
If there are multiple entries that meet your search requirement you can click on 'Nx' to find the next record. If a search finds no matches the Search bar will be re-initialized
for the next new search. A new search is started by clicking in the search bar again; the data there will be
erased and you can type in the search criteria for your next search. If you were searching for your zoologicalgardens.com account and typed 'garden'
and you had also an entry for Botanicalgarden.com, then the first record found would probably be the entry for Botanicalgarden.com. So just press 'Nx' to find your record.
The search is conducted across all data of each entry. That is all fields are search for the pattern you type in. New The Search Bar now will remember the
searches you have made, from as few as the last 5 to as many as 30 different search patterns will be remember for you. To repeat a previous search press the
dropdown arrow and click on the one you choose. The list is in reverse order older on the bottom newer at the top. You may want to
manage the search history list.
Managing the Search History List
You can manage the search history in two ways. First you can double click on a previous selection to delete it and second you can
delete all the Search history by using the
DB cleanup function on the
Maintenance page.
To delete by double clicking, the previous search item needs to be in the search bar
Start typing the search item in the search bar
The search bar will auto match what you are tying to what is in the list
When the item you want to delete is displayed use your mouse to double click on it
The single item is now removed from the list.
You can also Use the DB Cleanup function to delete all the search history
The 'Go' button initiates the search for the pattern you type in the search bar. The 'Go' button will become a 'Nx' (next) button if a successful search has been made.
If the search is not successful a 'Not found' message will be displayed.
Exit/Quit Button
This button can change appearances. If the Accounts form is selected as the start up form then when
the it is displayed this button is a red 'X' and means
exit the application completely. This is how you exit Account Tracker. If this form is not selected as the start up form then this button
is an exit door and means close the form and return to the previous form. You can select which form you want as your start up for in the
Options area under the Display tab of the Maintenance form.
Help Button
This button is page specific and open your default browser to this help page.
Add New Button
The Add New button initiates the process of adding a new entry or record. It will display the Add New Entries form.
Expanded/Large View Button
The Expanded View button switches from the current Short View view to the Expanded Detail view of your account list.
Security Image Popup
The Short view form tries to save screen size by giving the user the choice of data to display. This popup toggle button turns
on or off the optional display of the Security Image for the selected record. However, just like with the Expanded form the controls that
display the secondary data will only be visible if there is data to display. If the selected account entry has a security image when the
user clicks on this toggle button: the button will become high lighted and the Security Image Popup will display. If, however, the record
has no Security Image, when the user clicks on this toggle button the Security Popup will not display, but as long as the Security Image toggle
button is on (Hight Lighted) move the focus to another record with a Security Image and the popup will do just that, popup.
The user has the ability to move the popup windows to any location with in the Access window. The popup windows are position aware and will
popup in the same spot each time, unless the Account Names form is closed. Then all the popups with return to their default location.
Here is a image of all Toggles clicked on a record with data in all fields.
Re-Copy Button
The Re-Copy(R-C) button allows you to recopy the default Clipboard copy field to the Clipboard. (that's a mouth full) What this means is...
If you have the Clipboard copy option turned on, let's say to copy the password, when you select, find or click on an AccountTracker entry with a
password it will be copied to the Clipboard. Then you work with another application and overwrite the account's password on the clipboard,
you can easily retrieve the password by left clicking the Re-Copy button. Left clicking this button only works if the Clipboard copy option
is turned on.
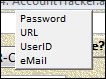
This Re-Copy button can also be right clicked which brings up a menu of the four fields that can be copied to the Clipboard (Password, User ID, eMail and URL).
In this mode the Default Clipboard copy option does not need to be turned on. Just select the field you want from the menu list by clicking on it,
the field data of the currently selected AccountTracker entry will be copied to the Clipboard.
By using this button the user never really has to type any of the online account info to access the account - right click re-copy and select URL and use your
browser's right click "Paste & Go" option; then right click the re-copy button again and select the UID and then the Password and paste them into the online account's
logon screen.
The Active? button
The Active? button or switch is the only filter left from the Expanded form. It filters the list of accounts displayed by the Active attribute.
The Active? button is a triple toggle meaning it has three states ('Both', 'Yes' and 'No'). It starts in basically the 'Yes' mode showing
only active entries, but click on it once and it filters the list to show only the in-active entries('No'). Click on it a second time
and the list is of both the in-active and active entries('Both'). A third click will return it to the on 'Yes' mode displaying only active records.
The Active status indicator
A check beside an entry name means that entry is still active. The Active? button filters the
entries based on this field. This field will corroborate the state on the Active? Button.
Field Display label
This display label changes with the press of either the Left
or Right Horizontal scroll buttons. In this case the data label is also
a double click actuator. It reveals the hidden passwords (or hides them again) when double clicked.
The horizontal Scroll buttons are interactive. Here the Account names form is displaying the primary data field Date Created. This is the time and date recorded for the creation
of this entry.
The horizontal Scroll buttons are interactive. Here the Account names form is displaying the primary data field Date Last Updated . This is the time and date recorded
when a field of this entry was changed..
The horizontal Scroll buttons are interactive. Here the Account names form is displaying the primary data field - Email Address. This is the email address used
with this account.
The horizontal Scroll buttons are interactive. Here the Account names form is displaying the primary data field - URL . This is the HTML address the user has saved
for this account entry which requires the use of the User ID and password to gain entry. Or it is the path to the
executable that the user has entered for a program on their local computer.
The horizontal Scroll buttons are interactive. Here the Account names form is displaying the primary data field - User ID . This is the User ID associated with the
save account. Usually this ID is used to gain access to the web site listed in the URL.
The horizontal Scroll buttons are interactive. Here we are back to displaying the primary data field - Password. As a default this field is hidden until the user double clicks on the
"Password**" label. Once revealed in this manner the passwords will remain uncovered until the Password** label is double clicked again
or the Accounts name form is closed and reopened.
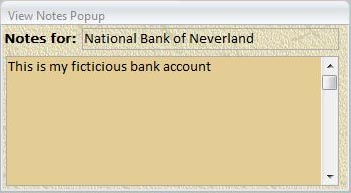
The Notes
The Short view form tries to save screen size by giving the user the choice of data to display. This popup toggle button turns
on or off the optional display of the Notes for the selected record. However, just like with the Expanded form the controls that
display the secondary data will only be visible if there is data to display. If the selected account entry has notes when the
user clicks on this toggle button: the button will become high lighted and the Notes Popup will display. If, however, the user has
no recorded any notes for this entry, when the user clicks on this toggle button the Notes Popup will not display, but as long as the
Notes toggle button is on (Hight Lighted) move the focus to another record with notes and the popup will do just that, popup.
The user has the ability to move the popup windows to any location with in the Access window. The popup windows are position aware and will
popup in the same spot each time, unless the Account Names form is closed. Then all the popups with return to their default location.
Here is a image of all Toggles clicked on a record with data in all fields.
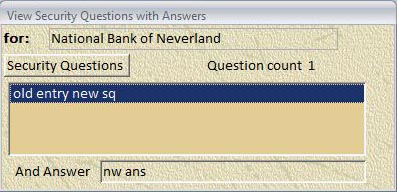
Security Questions and Answers
The Short view form tries to save screen size by giving the user the choice of data to display. This popup toggle button turns
on or off the optional display of the Security Questions and Answers for the selected record. However, just like with the Expanded form the
controls that display the secondary data will only be visible if there is data to display. If the selected account entry has Security Questions and Answers when the
user clicks on this toggle button: the button will become high lighted and the Security Questions and Answers Popup will display. If, however,
there are no Security Questions and Answers for this entry, when the user clicks on this toggle button the Security Questions and Answers Popup
will not display, but as long as the Security Questions and Answers toggle button is on (Hight Lighted) move the focus to another record with
Security Questions and Answers and the popup will popup.
The user has the ability to move the popup windows to any location with in the Access window. The popup windows are position aware and will
popup in the same spot each time, unless the Account Names form is closed. Then all the popups with return to their default location.
Here is a image of all Toggles clicked on a record with data in all fields.
Related Entries List
The Short view form tries to save screen size by giving the user the choice of data to display. This popup toggle button turns
on or off the optional display of the Related Entries List for the selected record. However, just like with the Expanded form the
controls that display the secondary data will only be visible if there is data to display. If the selected account entry has Related Entries when the
user clicks on this toggle button: the button will become high lighted and the Related Entries List Popup will display. If, however,
there are no Related Entries for this entry, when the user clicks on this toggle button the Related Entries List Popup
will not display, but as long as the Related Entries List toggle button is on (Hight Lighted) move the focus to another record with
Related Entries and the popup will popup.
The user has the ability to move the popup windows to any location with in the Access window. The popup windows are position aware and will
popup in the same spot each time, unless the Account Names form is closed. Then all the popups with return to their default location.
Here is a image of all Toggles clicked on a record with data in all fields.
The Secret Question list box
The Secret Question list box can display up to four secret questions, at once. These are the questions you have chosen when you made the
selected account. You can scroll through the questions listed with the up/down arrow keys; for which ever question is high lighted your secret answer to it
will be displayed in the
answers box.
The Answer box
The Answer box displays the answer for the high lighted secret question
in the Secret Questions box.
The Security image
This is the security image for the selected account. Many institutions will use a security image in the acknowledgement
protocol between you and their web site. It is so you can be a bit more confident that the site is not being spoofed or your browser
being redirected by a DNS high jacking. Account tracker allows you to save multiple security images for each account. If you have more
than one security image left and/or right facing arrows will allow you to scroll through them. the
name and date info
will change depending on which security image is being displayed.
This is the name or description of the security image being displayed.
These are the creation date and the date updated for the image being displayed.
The Notes box is scrollable and displays the notes you have made for the selected record.
Notice the high light on all the toggle popup buttons...
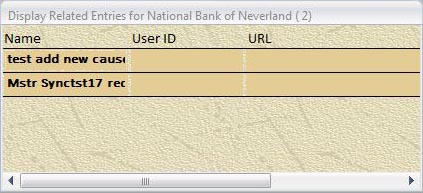
The related entries list is a list of all the entries you have decided have some relationship with the selected record.
This is a rather unique data field it allows you to link records to each other that have some relevance to you. Lets say you are a
member of several book clubs that all have online account and websites. You would store your account info for each separately,
but they are related, so by linking them using the Related links tab on the Edit Entry window, you can
switch between each related entry by Double clicking on one the entries in Related Links area. This is the only field where double clicking does not
bring up the Edit Entry window.
 form")

 and means close the form and return to the previous form. You can select which form you want as your start up for in the
Options area under the Display tab of the
and means close the form and return to the previous form. You can select which form you want as your start up for in the
Options area under the Display tab of the 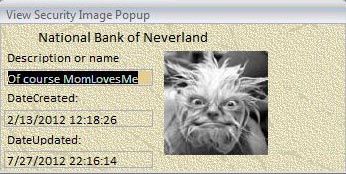
 In this mode the Default Clipboard copy option does not need to be turned on. Just select the field you want from the menu list by clicking on it,
the field data of the currently selected AccountTracker entry will be copied to the Clipboard.
In this mode the Default Clipboard copy option does not need to be turned on. Just select the field you want from the menu list by clicking on it,
the field data of the currently selected AccountTracker entry will be copied to the Clipboard.  displaying Date Created")
 displaying Date of Last update")
 displaying Email Address")
 displaying URL or program path")
 displaying User ID")
 displaying Password")
 Notice the high light on all the toggle popup buttons...